Cloudways Promo Code – Save 20% OFF (Updated 2021)
If you’re looking for a working Cloudways Promo Code, you’ve come to the right place.
I’ve secured a 20% OFF Discount Code for the first 3 months for my readers and viewers.
Use HOGAN to fully activate the discount (will be automatically applied after the first invoice)
Watch the video to learn how to apply the discount & launch your first server or follow the steps below.
How to Apply Cloudways Coupon Code (& Setup Your Website)
Follow the steps below to learn how to get started with Cloudways the right way.
Step 1: Go to Cloudways & Sign up for 3 Day Free Trial (No Credit card required)
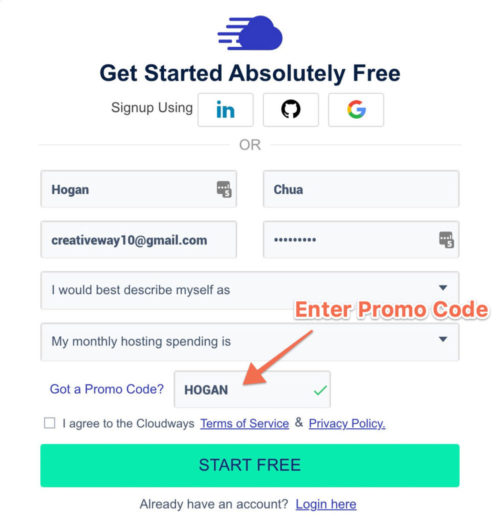
Enter in your details and then type “HOGAN” in the Promo Code section.
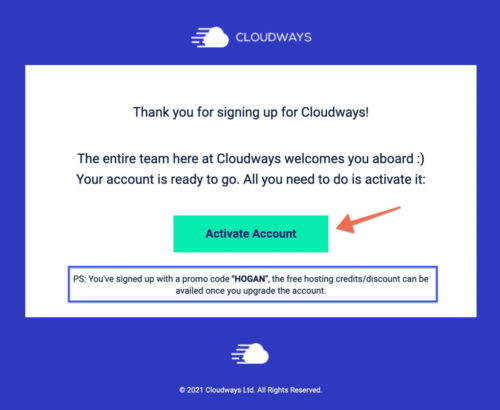
Step 2: Activate Account
Go to your email inbox, you should receive an email from Cloudways to activate your account (You will need to do this before you launch your servers).
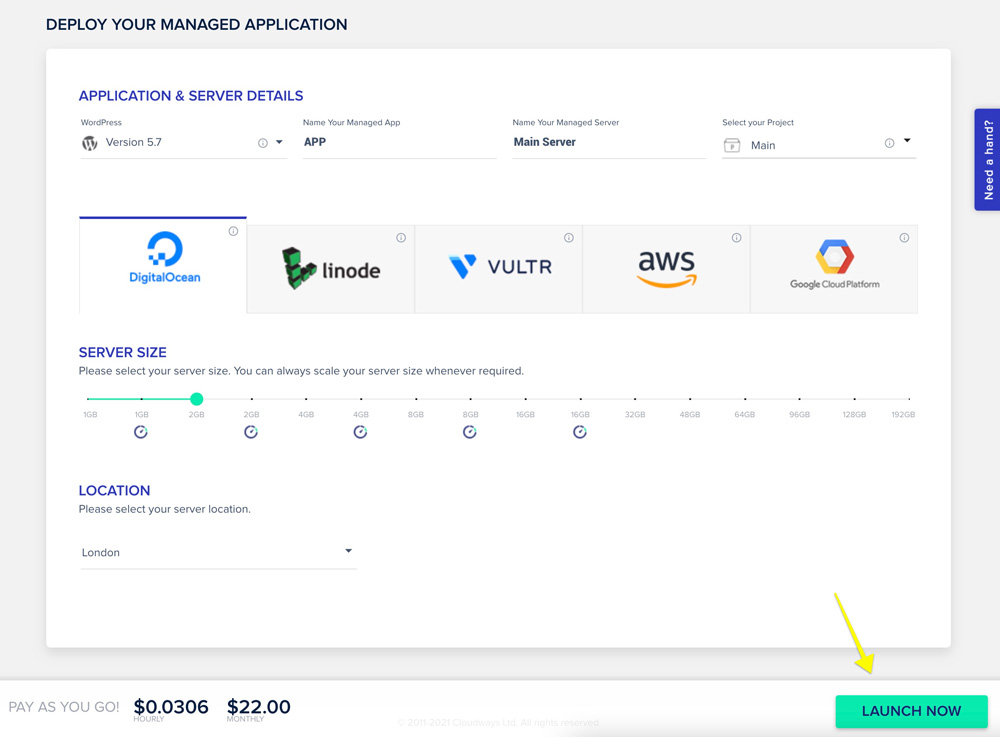
Step 3: Choose & Start Servers
Select your application, add your names and create your new project name.
- Next, select your server of choice. If you are not sure, scroll down for my recommendations.
Which one should you choose?
Tip: Don’t overthink it – You can still easily move servers if you need to, by cloning which takes 15-20 minutes depends on the size of the server.
Bottom Line
- Choose server location closest to your audience
- Mission-critical websites – Choose either AWS or Google
- Basic static business website/blogs – Choose DigitalOcean Standard
- WooCommerce/Dynamic Sites – Choose Vultr HF
- You can add unlimited applications/websites to each server provided within the storage limit. However, as traffic grows performance will decrease therefore will require you to scale up for more memory and processing power
- The 1GB Servers are great for most beginners since they can handle approx 70k pageviews per month. i.e. if you get 1000 unique visitors a day and they visit an average of 2.3+ pages each
Before choosing a server, there a few important things to consider:
1. Choose a server location closest to your audience
Generally, this should be your first priority, especially if you are creating a local business site – you want to choose a server location closest to your audience. As the server is closer, the is less distance for the data to travel – resulting in faster load times and better user experience.
So filter through and see which provider has one closest. If you are an international business with visitors from all continents – you can implement a CDN (content delivery network) then the server location will still relevant but less of a priority.
2. Are you creating a mission-critical website?
The next thing to consider is, are you building a mission-critical website for yourself or your client where any downtime at all is a problem.
If so, I’d recommend either AWS or Google. These are the TOP 2 most reliable infrastructures on Cloudways and have seen fewer issues in the Cloudways incident report.
Another benefit is that you can scale up and also scale down your server size automatically.
Downside? it’s around x1.5 -2 more expensive in terms of pricing when compared to similar server sizes on DigitalOcean, Linode & Vultr.
In terms of speed, they are very similar to the other three cloud providers.
With the other three providers (DigitalOcean, Linode & Vultr) you can scale up servers if you need more resources, however you can’t scale down automatically. For example, if you know you will getting a lot of traffic for Q4 (Peak eCommerce season) – then you might scale up.
But once that is over, you don’t want to be paying a high monthly renewal right? so you’ll want to scale down.
To do that, you will need to 1) Clone your server to the smaller one 2) Update your DNS setting with your new server IP. This normally will take 15-20 minutes to fully propagate (connect) therefore can result in downtime for some users.
3. For Basic Static Websites/Blogs – Choose DigitalOcean Standard
Through extensive testing, I found that DigitalOcean standard servers performed really well overall. DigitalOcean Premium Droplets (Intel Processors) offered only a slight increase in performance for static website tests.
The great thing about DigitalOcean is that you can scale into Premium droplets if you need without cloning servers (unlike Vultr & Vultr HF).
DigitalOcean Premium Droplets are only worth the 20% in price increase – if you are creating a more dynamic type of site such as using WooCommerce. Or if you are like me and simply just want every little improvement you can get – then go for it 🙂
4. WooCommerce/Dynamic Sites – Which is best?
If you have the budget and require more reliability & scaling down features, AWS is the best. Google didn’t perform as well in the WooCommerce checkout tests.
Vultr High Frequency is my 2nd choice – I recommend it for most people. Since cost is reasonable starting at $13/mo and they performed great (just behind AWS) in my tests.
My 3rd choice would be DigitalOcean Premium Droplets.
5. How many websites/apps can you add to a server?
Great news! You can have unlimited websites/applications on a server provided it is within the storage limits however performance will decrease as traffic grows since it will use more resources.
Then you would just need to scale up your server to the higher memory/CPU servers.
Here is a general guideline provided by Cloudways:
2GB server – 70 – 130k monthly page views.
4GB server – 130 – 300k monthly pageviews
8GB server – 300 – 650k monthly pageviews
16GB server – 650k-1.25mil monthly page views.
Note: these are just rough estimations. I recommend choosing the lowest tier based on the above and then monitoring your RAM/CPU usage within the Cloudways dashboard area. You might be able to save a few bucks every month.
Read my full article on which server to choose on Cloudways for a detailed breakdown.
Step 4: Wait for Server to Launch
Once, you’ve chosens and launched your server on Cloudways. They will setup your server and install your chosen application which normally takes between 15-20 mins.
Show Screenshot
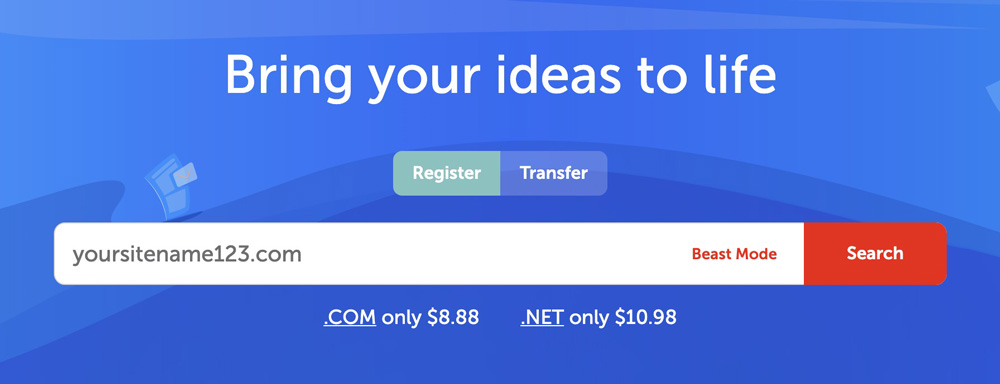
During this time, if you don’t have a domain name yet – i.e. yoursite.com, then you can purchase one from NameCheap. They offer cheap domain names but the best thing is that you get free domain privacy for life.
Step 5: Migrate Website (If you have an existing website)
Skip to the next step, if you don’t need to migrate your site over i.e. starting a new website.
TIP: You can also request up to 5 free migrations from Cloudways.
The basic steps of migrations:
- Install & Activate Cloudways WordPress Migrator Plugin on your existing (old) WordPress application hosted on your other provider.
- Fill in your email, accept the terms and Click on “Migrate”
- Next you will need to enter in 3 things. a) Destination URL – this is the URL that looks like this http://wordpress-123987-567345.cloudwayapps.com b) Your server i.p address c) database name
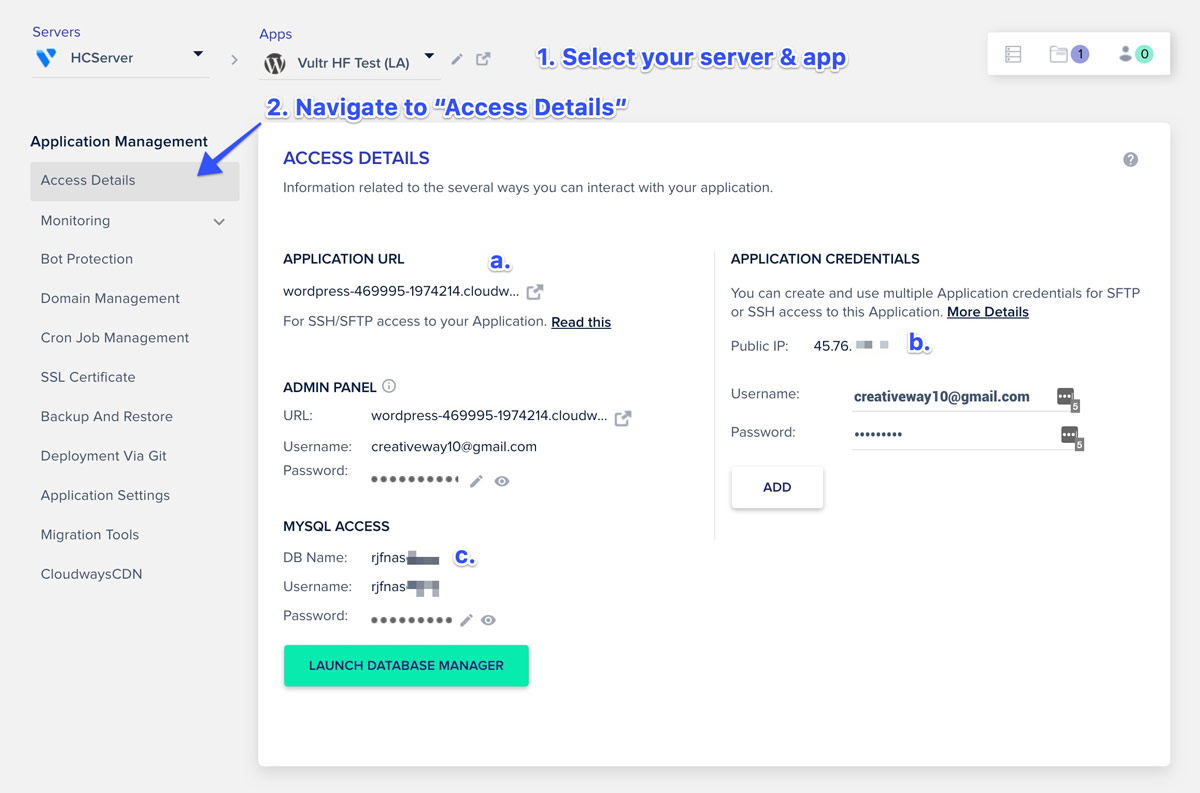
- Next, Fill in the rest of the information including your SFTP username + password (found by Clicking on “Server” > Under Master Credentials)
- Then, just hit Migrate and it will take a few moments. (depends on the size of your site)
For the full step-by-step instruction, you can refer to this article here.
Step 6: Connect & Add Domain Name
Next, you can connect your server to your domain name.
- Add your domain name to Cloudways (under your app > domain management)
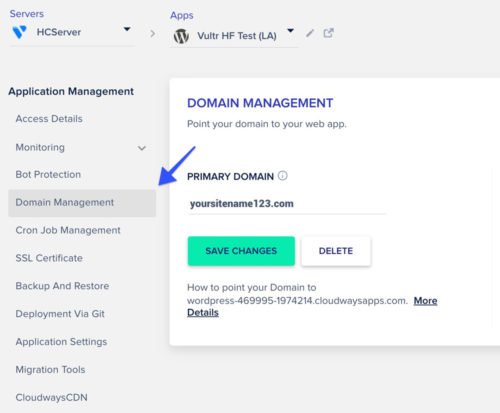
- Copy the IP from your server into the DNS settings of your domain registrar.
- Note: this is a similar process for all domain registrars, e.g GoDaddy or even if you got your domain from your previous hosting provider. Try to find the DNS settings.
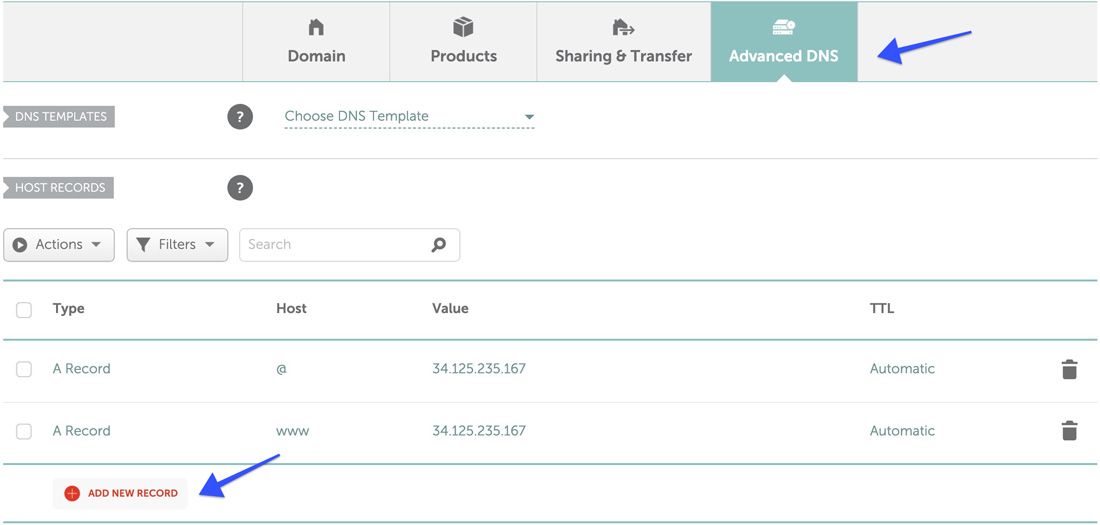
- Select “Add New Record” > A > Host = @ > Enter server IP > Save
- Next, do they same except for Host = www
- Save & wait for around 15-20 for propagation (connection)
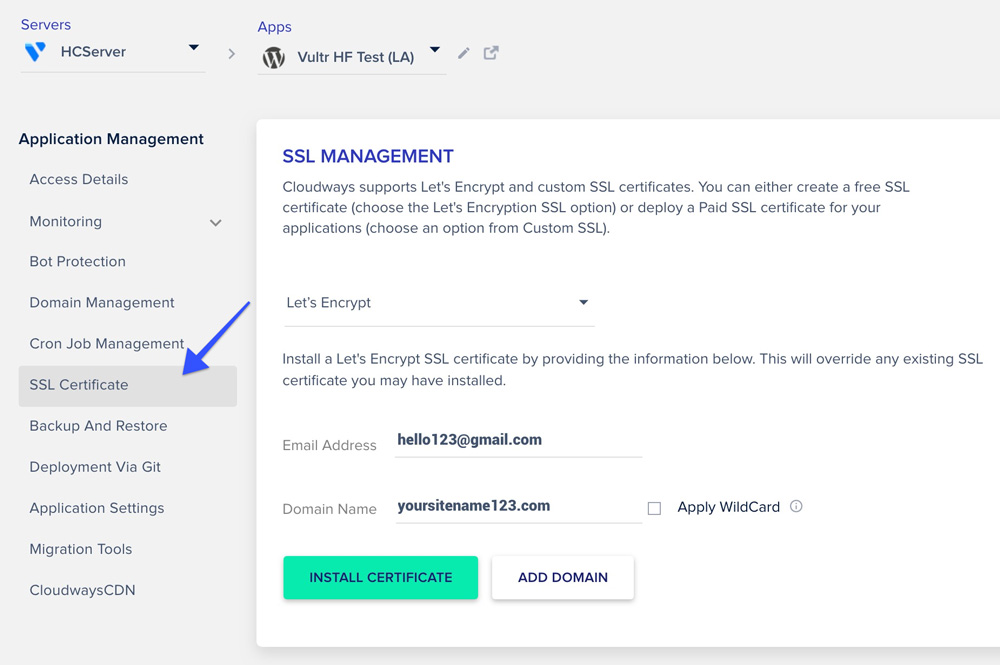
Step 7: Add SSL Certificate
Before adding the SSL certificate, check your site on whatsmydns.net to ensure that your new website has propagated (connected) to your domain.
Enter your domain and set to “A” record and search.
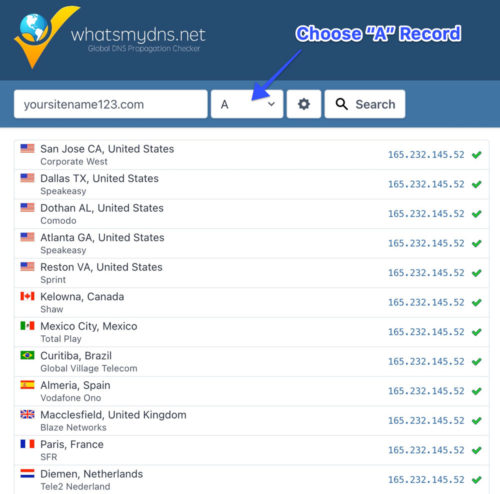
- Wait until most of them show a green tick, which should take around 15-20 minutes. Then you can go back to your Cloudways dashboard to add your SSL certificate.
Congrats you are done!
For a full Cloudways setup tutorial, you can watch the video below.
July 2, 2021 @ 2:42 pm
Let me know if you have any issues with the discount code. Or have any questions about which server to choose.