10 Amazon FBA Mistakes to Avoid That No-One Talks About!

Around 18 months ago, my sister and I decided to start Amazon FBA. We launched our first product around 4 months after we started product research.
We are currently selling in the Australian marketplace (amazon.com.au) and it is doing okay for our first FBA product. However, I definitely think it we could have saved much more time and money if we didn’t make these 10 Amazon FBA mistakes I’m about to share with you.
So, hopefully these tips will help your journey in starting Amazon FBA.
Mistake #1 – Not knowing the size tiers and pricing for packaging.
So our first mistake came with our packaging and failing to check the shipping fees associated with the size of the items.
Initially as we were doing product research, we purchased alot of our competitors products – some from Amazon, some branded and also from places like aliexpress.
We decided to create a packaging style (opening and dimensions) to be similar to a well known brand in our niche which doesn’t sell on Amazon. We thought it was very good, since no-one had that style on amazon and it felt more premium.
So we got the product, packaging and everything done and sent it our products to the Amazon warehouse.
And it was all good. Or we thought it was.
After we setup our Pay per click campaign, we started to make sales right away and everything was going great. But at the same time we were trying to think of how we could make it more profitable. Although we were making sales, the margins weren’t that great yet.
Our first shipment was shipped via Air. Our ads weren’t really optimized, we didn’t have A+ content yet among other things.
So we relised one of the ways to increase our profit was to reduce the FBA fees which was around $10 for selling a product of around $40.
So basically, there are two parts to the FBA fees
1. Referal Fee (This is a percentage of your product price and is determined based on your category, which can’t really be changed much now)
2. FBA fulfilment fees (this includes pick, pack and shipping to your customers)
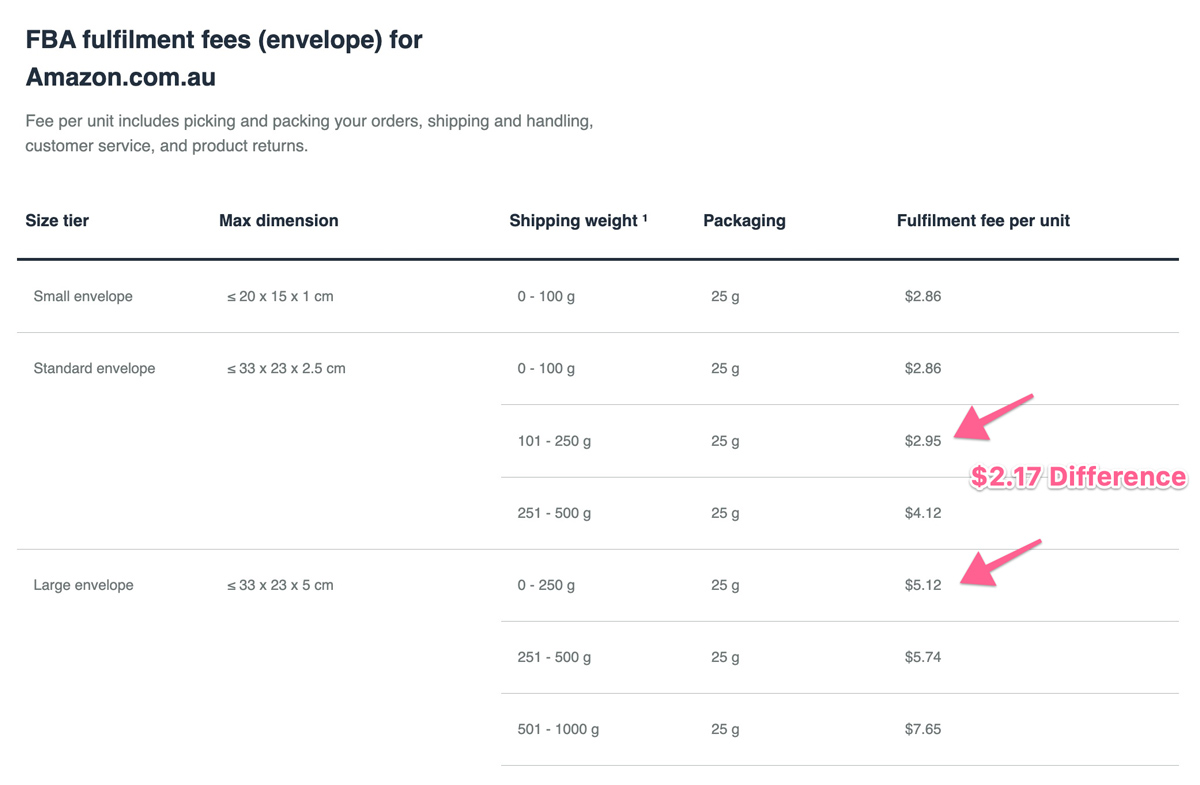
So based on our packaging size, we were actually in the large envelope 0-250g tier, which cost $5.12 per item sold. While this is actually an amazing price for shipping compared to local shipping options, if we made our product packaging less than 2.5cms in height it would be just $2.95 per item sold!
The savings would have been $2.17/item ($5.12 – $2.95)
So for example, if you save $2.17 per item sold and lets say you sell 1000 units per month – you would save $2170/mo or $26,000/year! This could be used for PPC, making your product price cheaper (could really significantly increase sales), reinvest into more product, or just using it for a holiday.
Lesson 1: Before creating your product packaging, you should always consider the packaging size tiers first.
See how it costs to sell on Amazon here: https://sell.amazon.com.au/pricing for AU or for US https://sell.amazon.com/pricing. You can also find the fees for other countries by search “amazon referral fee + country”
Mistake #2 – Packaging (Again…)
Yes, our 2nd mistake was related to packaging too!
So with the standard envelope (33 x 23 x 2.5cm) dimensions in mind, we set out to reduce our current height from around 3.5cms to 2.4cms in height.
After we approved the new design, we got the packaging made. We were really happy with how it actually looked, it felt more professional and proportional. So once we had our product manufactured and packaged in our new box, we shipped directly to the Amazon warehouse.
Note: Once the new new products arrive, you actually have to wait till your old inventory is finished before requesting a remeasurement – luckily we knew that and we timed it just in time. But for who are new people, you do have to keep that in mind. Because they will pick a random product off the shelf and if you have old stock – they are likely to pick that one first.
Once our old products were pretty much sold out, we requested a re-measurement of the new stock and once we got the result back.
That’s when we knew we pretty much screwed up again.
The remeasurement came back at: 23cm x 13.5cm x 2.9cm (height)
So we asked for a remeasurement and this time, it was even worst at 3cms in height.
At this point, I knew we would just have to live with it. If you haven’t dealt with the customer service for Amazon sellers it hasn’t been the best and the answers you get are very generic from my experience (even if you call).
Lesson 2: So if you want to be below the threshold, make sure its around 0.5cm below the threshold.
Mistake #3 – Not using WISE sooner (formerly TransferWise)
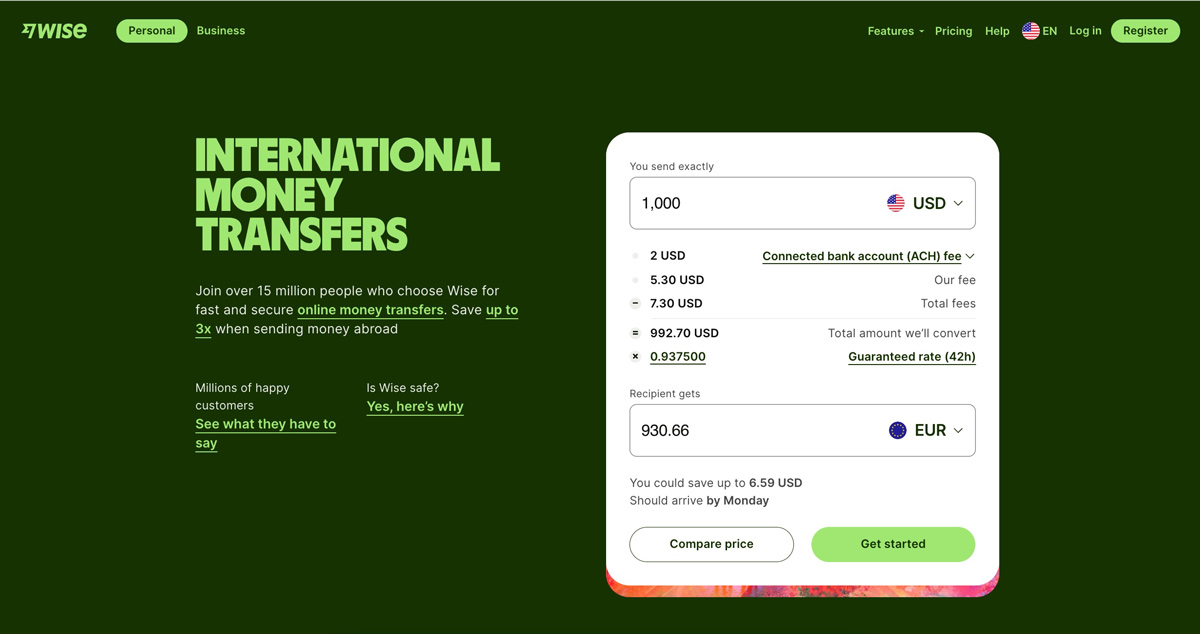
So my 3rd mistake was not using Wise sooner.
If I’d known about it earlier, I would have saved tens of thousands of dollars especially with my other online businesses that receive USD.
I think one of the reasons why it’s not mentioned as often in other videos is because many sellers and youtubers are from the US.
And when you are dealing with manufacturers from China, they normally want to be paid in USD. Since many are already based in the United States, you don’t need to convert your local currency into USD before transferring.
However, for Australia and other countries outside of the US, you will need to. And normally local banks don’t charge a fee to transfer money overseas but their exchange rate markups are very high. And this is costing you thousands if not tens of thousands every single year.
So let me explain.
For example. If I want to send $10,000 USD to a manufacturer in China from Australia.
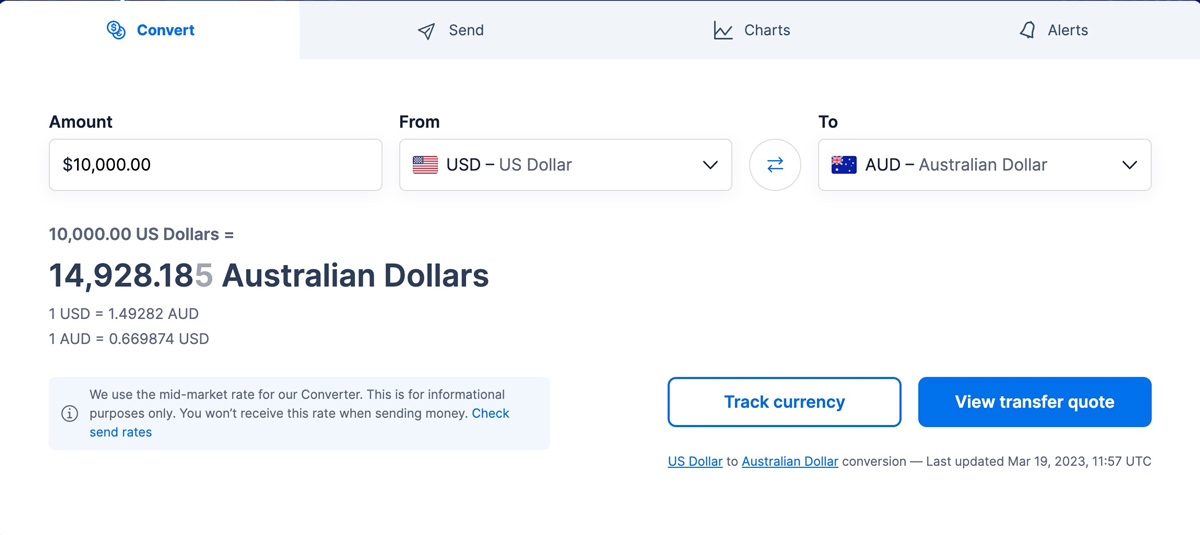
If I go to a website like xe.com to check the rate and see how much AUD I would need. It would be around $14,933 AUD for $10,000 USD (March 19th 2023).
However, if you want to actually send it – you would do so from your local bank. And as you see, you would need around $15,470 AUD to send $10,000 USD it to your my manufacturer.
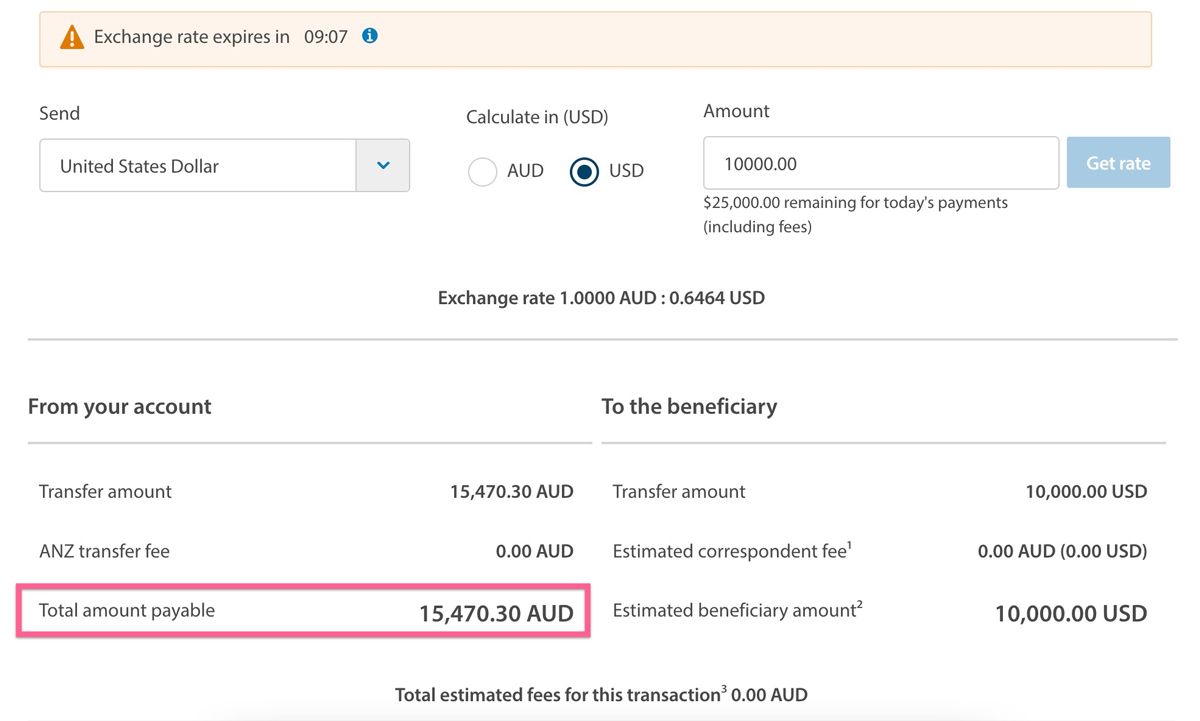
Even though the bank doesn’t charge a “transfer fees”, you can see that the difference is more than $500! That is the exchange rate markup!
So as you see, I was thinking there must be a solution for this, the bank is charging way too much. And that’s when I discoverd Wise
What is WISE?
Wise is basically an online money transfer company that offers a cheaper and faster way to send and spend money internationally. They also offer debit cards, which means you can also use it for travelling internationally and purchasing things. They use the mid market rate for the conversions (the same rate you get from xe.com or google.com) then they charge you a small fee.
So for example
If I want to send $10,000 USD, it only would be a total of $14,999.87 AUD. It uses the mid market rate + a small fee ($72.27 in this case). See below.
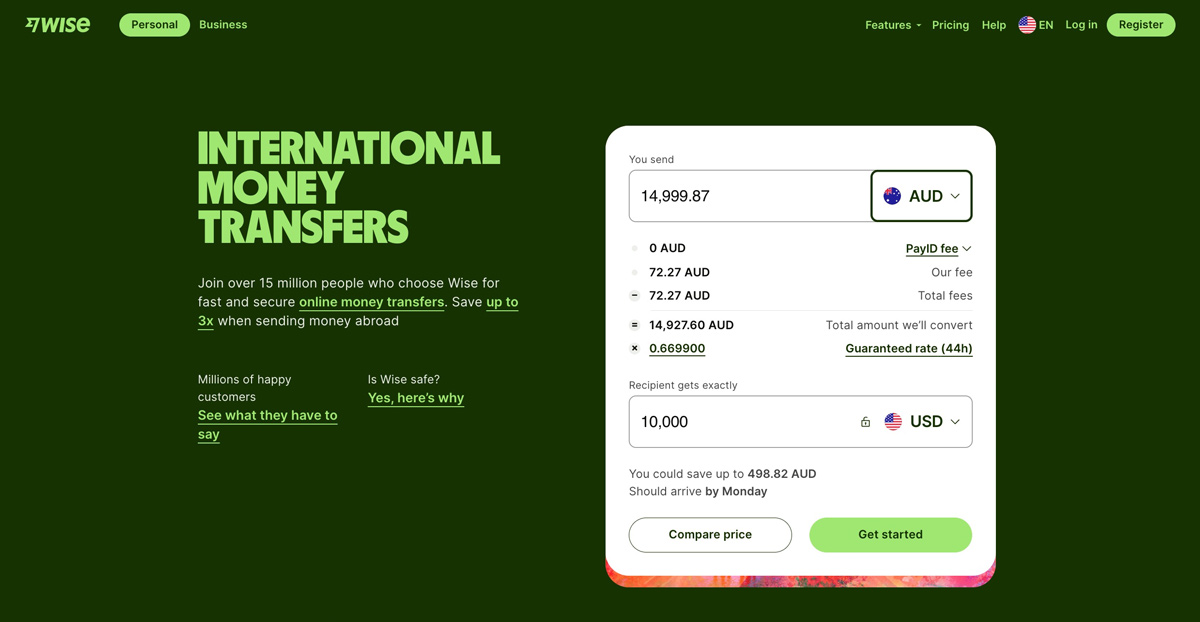
Now, compare that my local bank of $15,470 AUD – we save around $470!
Imagine sending $100,000 USD per year internationally, you’d save around $4700 AUD without any additional work!
Another benefit of it, is that you can also receive money in your Wise account. So for income I can receive in USD, I can convert it to my local currency at a much better rate then my bank or even PayPal!
It really is amazing, and I can’t recommend it enough. I’ll make a full video on how it actually works and how to use it very soon.
You can check out the link below to get a fee-free transfer of up to $1000!
Referal Link: https://hoganchua.com/fee-free-transfer-wise
Lesson 3: Use WISE or other money transfer platforms rather than your local bank for international money transfers.
Mistake #4 – Not checking the inventory limits before shipping in products
Prior to starting my Amazon FBA brand, I had another product that sold on its own website and I wanted to also list it on Amazon.
So when I was about to send in the inventory to Amazon, I realised that there was a limit to how much I could send in. In this instance, it was limited to only 300 pieces and I had around 800+pcs that I wanted to ship in. So it would mean I would need to ship it in around a total of 3 times, which is going to cost a lot more than shipping it in just once.
So before ordering your first order, make sure to log in to your Amazon seller central account, Go to the menu > Inventory > Manage FBA Shipment > “Send to Amazon”. On this page, you can scroll down to the bottom and you’ll see a small dropdown arrow called “Restock Limits”. Click it and it will show your current limits.

This is even more important to know if you are shipping directly from your supplier overseas to the Amazon warehouse. Because normally when you make your order, they will have a mininum order quantity. And if you can only ship in 300 pcs, but have 1000pcs ready, it will likely cost you extra, because if you want to store the excess inventory at your own house, you will first need to ship it to your house, then ship it again to the warehouse. That’s two shipping costs and also you will need to find storage space whether at your own house or a 3rd party warehouse.
To fix this issue, it will require you to build up your sales history (also known as your Inventory Performance Index). After a few months of selling, Amazon will increase you – and I’m not sure of any way to actually fast track this.
So you will need to control it from your end. Perhaps you can order a smaller amount to start off with and pay higher per unit or perhaps negotiate with your supplier to keep some of the stock in their warehouse.- then ship it together with your 2nd batch.
Lesson 4: Always check your inventory limits before placing your first and subsequent orders.
Mistake #5 – Applying for Trademark myself
So when I started my FBA Brand, I knew we had to get Brand Registry because having it would give us alot of different benefits that would help us compete in the marketplace.
Some of the benefits include:
-
- A+ Content – the content below your main product listing, this basically means you can showcase the benefits and features with photos and graphics.
- Enhanced Brand Protection – such as preventing counterfeit listings or people editing your product listing
- Additonal Advertising Spots – So with the basic Amazon PPC (Pay per click), you can only advertise in a few spots on the page, with Brand registry – it’s going to give you the ability to appear in more spots and also display videos.
- Amazon Storefront – this is like having your own mini website to showcase just your own products.
- Brand Analytics – Access to advanced analytics, get more data on your customer’s search and the buying behavior of your target customers.
However, I thought I had to get the trademark myself, which I did apply for by myself – then go through the IP accelerator. But later realised through the IP Accelerator, Amazon has actual vetted trademark firms that you can choose from. Then through them, they will apply for you, and when the trademark is pending you are able to get Brand Registry.
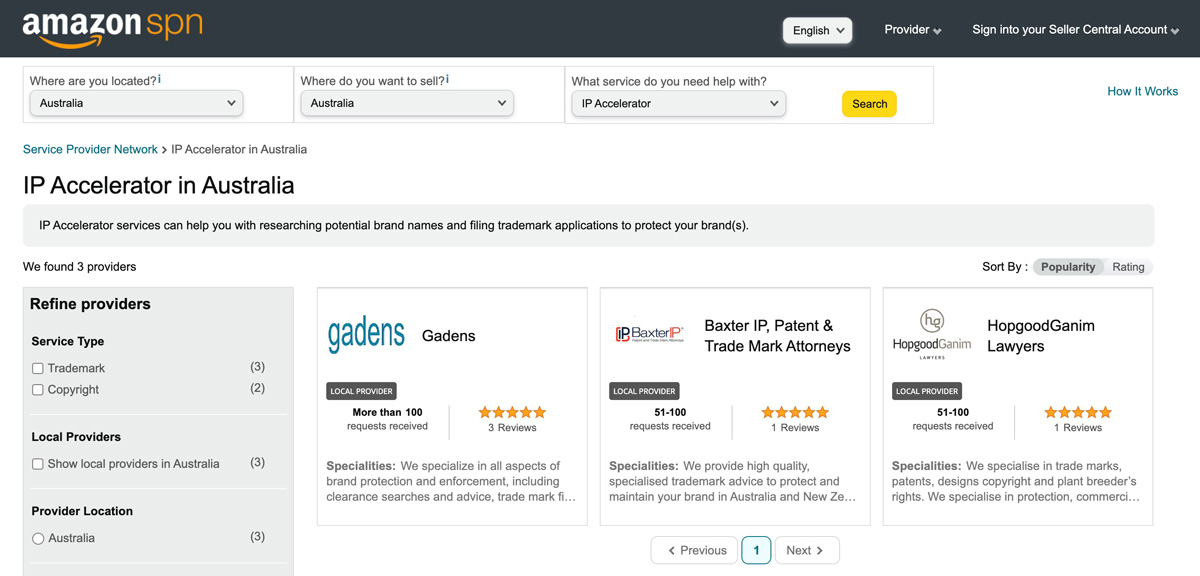
If you do this yourself, you will need to wait at least 6 months before you can apply to get a Brand registry. And this is exactly how long we waited. Luckily we were in the Australian marketplace, where the competition wasn’t as strong yet.
If you are going through the IP Accelerator directly, it will only take a few weeks to get your brand registry even though your trademark is still “pending”. The reason for this is because going through the vetted trademark firms, they will generally know if you will actually get your trademark or not for your brand.
Lesson 5: Go through the IP Accelerator if you want to get your Brand Registry in a few weeks!
Mistake #6 – Not shipping the Q4 inventory in much sooner.
My 6th mistake was not shipping in my Q4 (Oct, Nov & Dec) inventory sooner, and not shipping in enough units.
In other words, we needed better inventory planning.
I actually think this is one of the hardest parts of eCommerce and Amazon FBA because there are so many different factors you need to take into account. Ordering too little will cost you, or ordering too much will cost you too. And not shipping it on time will cost you. And it’s kind of hard to predict especially if it’s your first year selling.
However, here are just some things I wish we did better:
- Add at least 2+ weeks to the production time + shipping time. So if the normal production and shipping time is 60 days. Then I would order stock at least 75 days in advance.
- Don’t take any money out of business at all, not even a salary (if you can help it). Because as you are making sales, you’re going to need to order even more stock. And you normally don’t get paid instantly – you need to pay a lot more upfront.
- Don’t be afraid to add additional capital of your own if you have it, or seek funding – if you are making consistent sales already. Q4 is going to need much more inventory. For us, it was around 40-50% more sales compared to normal months.
Note: I also highly recommend YuPing Wangs YouTube Channel for sourcing and learning about inventory planning/management. There is a wealth of knowledge here which you can’t find in other courses.
Lesson 6: Inventory planning is crucial, make sure to stay on top of it.
Mistake #7- I purchased a $2000 course, that wasn’t up to par with a Free Course.
When I was first interested in Amazon FBA I bought a course, it was I think $1000 or $2000. I went through it and it seemed good at that time.
But 1-2 years later, when I really wanted to launch a product – I started using Helium10 for product research. A tool that helps you to find profitable products to sell on Amazon. And at the time, I was just using it for that purpose. I also used Jungle scout for a bit to check out the US marketplace, but it wasn’t available for the Australian market.
Helium10 shows the number of monthly sales for products, also keyword search volumes so you can find a keyword will good demand, and low competition to start selling it. It’s a must-have tool for anyone wanting to start Amazon FBA or Walmart.
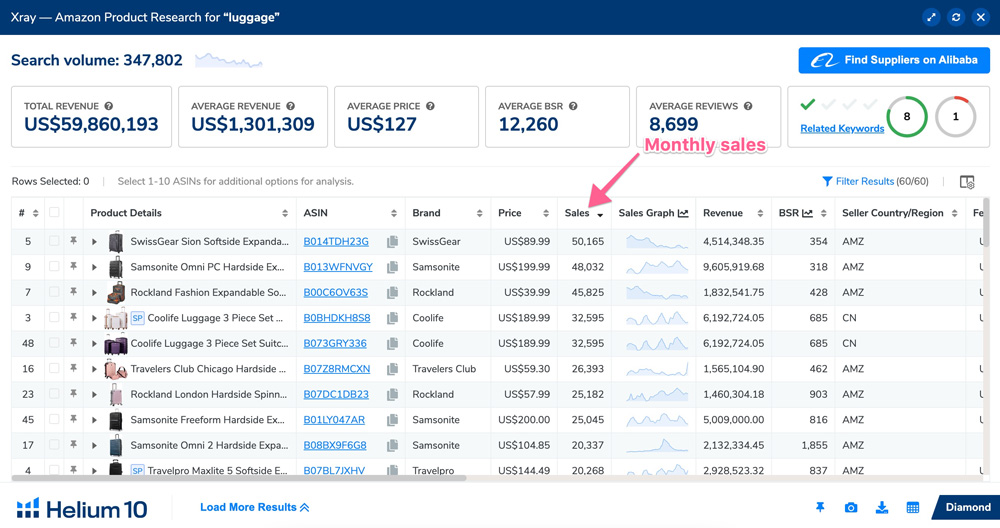
As I was using this tool for product research, I noticed there was 3 complete courses on starting Amazon FBA, Amazon PPC aswell as a course on how to exit your Amazon FBA business.
They barely advertised it at all! and surprisingly it was much better information then the paid course I bought earlier. Audio and video were also much higher quality.
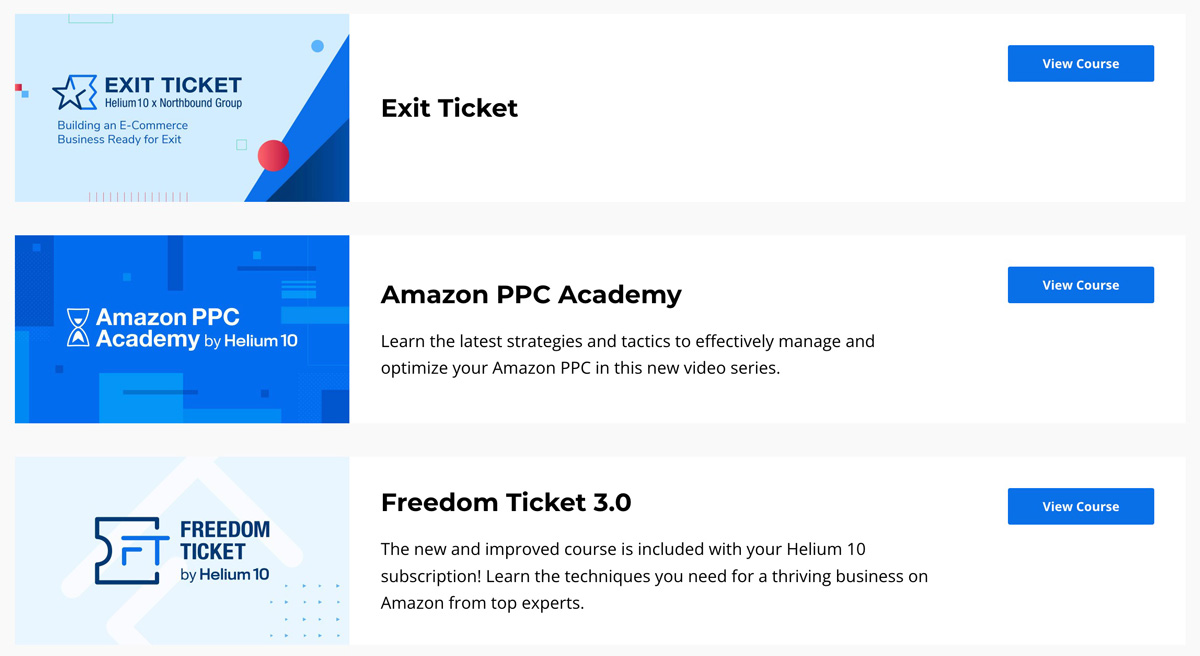
So for those of you who haven’t purchase a $2000 course yet, hold back first – Check out the free course inside Helium10 because you will need a tool like that to find your products to sell anyway.
Lesson 7: Get Helium10, it has everything you need to start, manage an Amazon business including 3 courses (Freedom Ticket 3.0, Amazon PCC Academy & Exit Ticket)
Mistake #8 – Spending too much time trying to create a brand
If I were to go back in time, I’m not sure if I would spend time creating a website, or Instagram to create a brand. Because from my experience, it doesn’t affect it too much. And I would rather use that extra time and money to price my item at a cheaper price, a coupon discount for the product, or find more products to sell. I think this actually dramatically increases the total revenue, though profit per item is less, the volume and time saved makes up for it!
At the same time, it may be different for you. This may also depend on the competition, demand, and price point that you want to sell at.
But it’s definitely something to think about. Because most people will tell you to create a nice brand etc. But I’ve seen nice brands, just get dominated by products that are of lower quality, no website but lower price. The business model is that they operate at low cost, with more products, and lower competition keywords and efficiency.
However, do keep in mind your product listing should be top-notch and the best that you can make it.
Lesson 8: Launch your product as soon as possible and as efficient as possible. Creating a brand may slow you down, if you are too focused on it. Don’t do what everyone teaches, if you want to get results different from others.
Mistake #9 – Having the Instructions & Coupon Code on one single card/booklet
This is a small mistake, and I think it will make a difference in your overall sales.
In our product, we had a small cardboard insert with instructions on how to use the product. And on that insert, we also had the coupon code for the next purchase.
So I personally think this could have been more effective if it was on two separate inserts because a lot of people are likely to miss it if they don’t read the instructions.
I only realized this when I ordered Youfoodz which is a meal delivery service, And in their box – they had their coupon to refer a friend as a separate.
It seemed like a much better idea and it proved to be right!
Lesson 9: If you want to have a coupon code, have it on a separate card – this makes it more visible and likely your customers won’t miss it!
Mistake #10 – Not starting earlier
My last mistake is not starting earlier. I know this is very cliche but it’s true.
Amazon FBA began in Australia in 2018, and I started selling in November 2021. Almost 4 years later. If we started in 2019, I think we would have been much further ahead.
At that time, it just seems like no one was really selling. Not many tools had accurate sales data. So there was uncertainty and that kind of held us back.
But looking back, it would have been the best time. Even if we started small, and test it out, we would have learn’t so much that if the first product wasn’t profitable our 2nd, 3rd, and future products would be.
And as you guys know in 2020 when the pandemic hit – all everyone could do ordered from Amazon and get it delivered! So we missed out on that because we didn’t start earlier!
The thing is the conditions are never going to be perfect. Even if you are starting in a place like the US Amazon marketplace, you might think it’s high competition but there is always a gap if you look carefully enough. The skills you learn from it are invaluable and will carry on to your next venture.
Lesson 10: “The best time to plant a tree was 20 years ago. The second best time is now.” – Chinese Proverb
Final Words
Don’t let these mistakes/failures stop you. You will make a ton of mistakes, but you just need to think of it as a stepping stone to success.
Amazon FBA is amazing for those of you who want to get into e-commerce but still want some passivity in terms of your lifestyle, since Amazon does all the heavy lifting. Once you set it up and do it correctly it is pretty much in maintenance mode and about adding more products.